How does your office space look right now? Take a second and look around. Is it the most inspiring environment to work in?
If you’re like many of the small business owners I work with, the answer is probably “not exactly.” A cluttered, disorganized office isn’t just an eyesore — it’s a productivity killer. It distracts you from getting things done, makes it harder to find what you need when you need it, and can even give clients (affiliate) and colleagues (affiliate) the impression that you’re unprofessional. None of that sounds efficient, right?
The good news? You don’t need to shut down for a week to get things under control. Today, I’m sharing a 15-day office decluttering challenge designed specifically for busy small business owners and solopreneurs. Each day tackles one specific area so you can chip away at the clutter without feeling overwhelmed.
Key Takeaways
- Many business owners face disorganized offices that hinder productivity; a clean space inspires efficiency.
- The article offers a 15-day challenge to declutter the office, tackling one area per day to prevent overwhelm.
- Daily tasks include organizing desk (affiliate) drawers, filing cabinets, digital files, and even break rooms to improve functionality.
- The article emphasizes flexibility in completing tasks and maintaining organization through daily habits and regular reviews.
- By the end of the challenge, your office should be cleaner and more manageable, supporting your productivity better than before.
Before You Begin: A Few Ground Rules
Be flexible with your timeline. If you can’t complete the entire list in 15 consecutive days, that’s perfectly OK. Schedule the tasks a few times a week and aim to finish within a month. The important thing is progress, not perfection.
Break big tasks in half. Depending on the size of your office, some activities may take just 15 minutes while others could take a full day. If you find a particular task stretching past four hours, split it into two sessions. There’s no rule that says you have to knock out everything at once.
Grab your supplies ahead of time. Before you start, make sure you have trash bags, a recycling bin, a shredder (or a shred pile), labels (affiliate), and any organizing containers you think you’ll need. Having everything on hand will keep you from losing momentum mid-task.
Use the “Four-Box Method.” For each area you tackle, sort items into four categories: Keep, Trash, Donate/Give Away, and Relocate. This simple system helps you avoid decision paralysis.
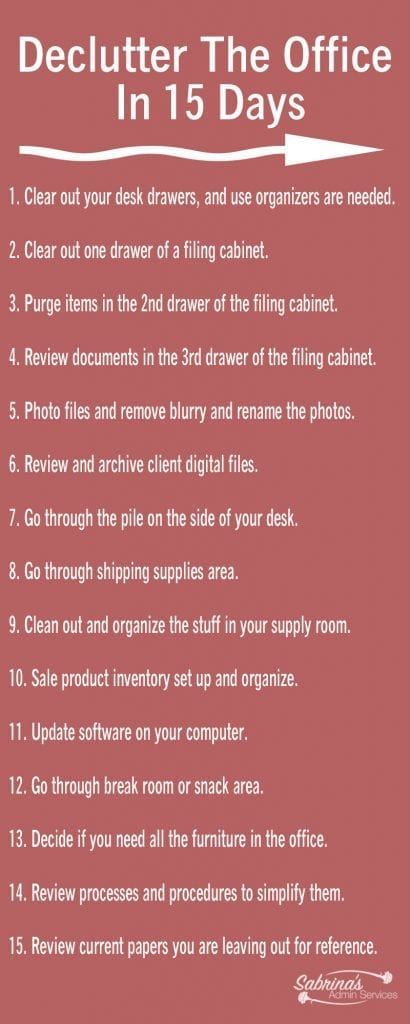
15-day Declutter Your Office Challenge
- Before You Begin: A Few Ground Rules
- Day 1: Clear Out Your Desk Drawers
- Day 2: Tackle the First Filing Cabinet Drawer
- Day 3: Purge the Second Filing Cabinet Drawer
- Day 4: Archive or Shred the Third Filing Cabinet Drawer
- Day 5: Organize Your Digital Photos
- Day 6: Review and Archive Client Digital Files
- Day 7: Conquer the Desk Clutter
- Day 8: Organize the Shipping Supplies Area
- Day 9: Clean Out and Organize Your Supply Room
- Day 10: Set Up and Organize Your Product Inventory
- Day 11: Update Your Computer Software
- Day 12: Refresh the Break Room or Snack Area
- Day 13: Evaluate Your Office Furniture Layout
- Day 14: Review and Simplify Your Processes
- Day 15: Organize Your Reference Papers
- Maintaining Your Organized Office
- Frequently Asked Questions
Day 1: Clear Out Your Desk Drawers
We’re starting with an easy win to build momentum. Pull out everything — and I mean everything — from your desk (affiliate) drawers. Wipe the drawers clean, then sort through what you removed.
Get rid of anything that is broken, dried out, or no longer used. Those pens (affiliate) that haven’t worked since 2019? Toss them. The stack of sticky notes (affiliate) you’ll never use? Donate them. Rubber bands that have lost their stretch? Gone.
Once you’ve purged, use small drawer organizers (affiliate) to give everything a designated spot. Group similar items together: writing supplies in one section, sticky notes (affiliate) and notepads (affiliate) in another, and tech accessories like charging cables and USB drives (affiliate) in their own compartment. The goal is to be able to open a drawer and immediately find what you need without rummaging.
Quick tip: If you don’t have drawer organizers (affiliate), small boxes, jar lids, or even repurposed food containers work great in a pinch.
Day 2: Tackle the First Filing Cabinet Drawer
Start with the drawer that holds your most essential, frequently accessed files. For many small business owners, this is where current client files (affiliate), active invoices, or bills to pay live.
Pull everything out and go through each folder. Ask yourself: Is this still relevant? Is it in the right place? Does this folder label still make sense?
Create a clear, consistent labeling system if you don’t already have one. Group files into broad categories first (Clients (affiliate), Financial, Vendors, etc.), then organize alphabetically or chronologically within each category. Make sure the tabs (affiliate) are easy to read — if your handwriting is hard to decipher, consider printing labels (affiliate).
Pro tip: Keep the most frequently used folders at the front of the drawer so you’re not digging through the whole drawer every time you need something.
Day 3: Purge the Second Filing Cabinet Drawer
Now move on to the drawer with your second-most-important papers. These often include general business files like insurance documents, contracts, vendor agreements, or marketing materials.
Go through each file the same way you did on Day 2. If a document is outdated, no longer relevant, or duplicated elsewhere (such as in a digital file), it’s time to let it go. Shred anything with sensitive information before recycling. If this drawer doesn’t have a clear purpose yet, now is the time to create one. Assign it a category and build a filing system with like subjects grouped together. Having a defined purpose for each drawer prevents them from becoming a dumping ground for random papers.
Day 4: Archive or Shred the Third Filing Cabinet Drawer
This drawer typically holds your least-accessed items — archived files, old project records, reference materials you rarely need. Because these files don’t need to be within arm’s reach, this is often where the biggest purge happens.
Ask yourself for each file: When was the last time I looked at this? Will I realistically need it again? If the answer to the IRS question keeps you up at night, remember that most tax documents only need to be kept for three to seven years, depending on the type.
You’ll likely be able to shred or recycle most of what’s in this drawer. For anything you need to keep but don’t access regularly, consider moving it to a storage area outside your immediate workspace, such as a closet shelf or an off-site storage box. Label the storage container clearly so you can find it later.
Day 5: Organize Your Digital Photos
Here’s a task you can do in front of the TV during off-business hours. If you take photos for your business — job sites, product images, event photos, before-and-afters — there’s a good chance your photo library has gotten out of control.
Start by backing up all your photos to your computer or cloud storage if you haven’t already. Then go through and delete any blurry, duplicate, or no longer needed photos.
Next, organize what’s left. Create a clear folder structure and rename your files so you can actually find them later. A naming convention that includes the client name, project type, and year works well. For example: “Smith-Outside-Walkway-2026” or “Johnson-Kitchen-Remodel-2026.”
If renaming individual files feels too tedious, at least sort them into descriptive folders. Your future self will thank you the next time you need to pull up a photo for a client or your portfolio.
Day 6: Review and Archive Client Digital Files
Now turn your attention to your digital client files (affiliate). This is one of the most impactful tasks in the entire challenge because a disorganized digital filing system wastes a great deal of time. Every minute you spend hunting for a document is a minute you’re not spending on billable work or growing your business.
Make sure you have a clearly named folder for each client. Within each client folder, consider creating subfolders for different types of documents, such as contracts, invoices, correspondence, and project files.
While you’re at it, archive files for clients (affiliate) you’re no longer actively working with. Move them to an “Archive” or “Past Clients” folder so they’re out of your way but still accessible if needed. Delete anything that’s no longer relevant, such as outdated drafts or duplicate files.
Pro tip: Take five minutes at the end of each workday to file new documents properly. This small habit prevents digital clutter from building up again.
Day 7: Conquer the Desk Clutter
It’s time to tackle the actual clutter sitting on your desk (affiliate) surface — the piles of paper, random sticky notes (affiliate), business cards (affiliate), and “I’ll deal with this later” items that have taken up permanent residence.
Start by removing everything from your desk. Yes, everything. Wipe the surface clean. Then go through each item one by one and decide: Does this need to be on my desk, or does it have a better home somewhere else?
Your desk should ideally hold only the items you use daily: your computer, phone, a notepad (affiliate), and maybe one or two personal items. Everything else needs a home — in a drawer, a file, a shelf, or the trash.
For papers that need action, create a simple inbox system. A single “To Do” tray or folder keeps action items visible without creating a pile. Once you’ve dealt with something, file it or toss it immediately.
Visit our post about [How To Permanently Clear Desk Clutter Forever] for detailed step-by-step guidelines.
Day 8: Organize the Shipping Supplies Area
Whether you ship products to customers or just occasionally mail documents, your shipping supplies area deserves some attention. This area might be a shelf, a closet, or a full packing station — regardless of size, it should be organized and stocked.
Go through your envelopes (affiliate), tote for filing paper (affiliate), tape (affiliate), labels (affiliate), and packing materials (affiliate). Toss anything that’s damaged, bent, or too small to be useful. Check that your scale is working and that your label printer has supplies.
Group items by type and size. Keep the supplies you use most often within easy reach, and store backup stock on higher shelves or in a nearby closet. If you ship frequently, consider creating a dedicated shipping station with everything you need in one place, so you’re not hunting for tape (affiliate) every time you send a package.
For more ideas, check out our post: 7 Essential Office Zones Every Small Business Should Have
Day 9: Clean Out and Organize Your Supply Room
Office supplies have a way of multiplying when you’re not looking. Before you know it, you’ve got three staplers, a lifetime supply of binder clips, and pens (affiliate) scattered across every surface.
Pull everything out of your supply area and take stock of what you actually have. Group like items together and get rid of anything dried out, broken, or obsolete (hello, floppy disks and fax cover sheets).
You don’t need expensive organizing systems to get this area under control. Repurpose containers you already have — mason jars for pens (affiliate), small baskets for sticky notes, shoeboxes for miscellaneous supplies. The key is giving every item a designated home so you always know where to find it and when you’re running low.
(Here’s an example of what I did with our office supplies: How to Organize Office Supplies with Minimum Expense
Day 10: Set Up and Organize Your Product Inventory
This one applies if you sell products or use materials to create something you sell. Whether it’s handmade goods, retail inventory, or raw materials, this area should be meticulously organized.
Start by taking a complete inventory of what you have. Note quantities, conditions, and expiration dates if applicable. Get rid of anything damaged, expired, or unsellable.
Then organize what remains in a logical system. Group items by category, size, or frequency of use. Label shelves and bins clearly. If you’re using a first-in, first-out system (and you should be for anything with an expiration date), make sure older stock is placed in front of newer stock.
Consider creating a simple spreadsheet or inventory tracking system if you don’t already have one. Knowing exactly what you have on hand prevents both over-ordering and those panic moments when you realize you’re out of a key supply right before a big order.
Day 11: Update Your Computer Software
This might not feel like a “decluttering” task, but outdated software creates digital clutter in the form of security vulnerabilities, compatibility issues, and sluggish performance. Think of it as decluttering your digital workspace.
Check for and install updates on your operating system, web browsers, antivirus software, and any business applications you use. Don’t forget about plugins and extensions — outdated ones can slow down your browser and create security risks.
While you’re at it, uninstall any programs you no longer use. They’re taking up space and potentially slowing down your computer. Review your browser bookmarks as well and delete any that point to dead pages or sites you no longer visit.
Make this a recurring task. Setting a weekly or biweekly reminder to check for updates takes just a few minutes and keeps your systems running smoothly and securely.
Visit this post for more details: 12 Important Updates to Do to Keep Your Business Secure
Day 12: Refresh the Break Room or Snack Area
Even if your “break room” is just a corner of the kitchen counter, it deserves a refresh. A clean, inviting break area encourages you to actually take breaks — which, despite what hustle culture tells you, makes you more productive, not less.
Clear out expired snacks (affiliate), stale coffee (affiliate), and any dishes that have been “soaking” for longer than you’d like to admit. Wipe down all surfaces, clean out the microwave, and check the refrigerator for anything that’s developed its own ecosystem.
Restock with snacks (affiliate) that will actually fuel your afternoon — nuts, granola bars, fresh fruit, or whatever healthy options keep you going. If you share the space with others, consider setting up a simple system to keep it organized, such as labeled bins, a shared grocery list, or a rotating cleaning schedule. Visit our post about How to Create an Inviting Break Room for more inspiration.
Day 13: Evaluate Your Office Furniture Layout
Sometimes the biggest source of clutter isn’t stuff — it’s furniture. An office crammed with too much furniture feels claustrophobic and makes it harder to move around efficiently.
Walk around your space with fresh eyes. Do you have at least three feet of clearance in walking areas? Can you move freely between your desk, filing cabinets, and other frequently used areas? Or are you constantly squeezing past that extra bookshelf or side table you never actually use?
If your office feels cramped, consider removing a few pieces. That extra chair (affiliate) nobody sits in, the filing cabinet (affiliate) you emptied on Day 4, or the decorative table that’s become a clutter magnet — they might be better off in storage, donated, or repurposed elsewhere. Rearranging what remains can also make a surprising difference. Sometimes, simply moving your desk to face a window or repositioning a bookshelf to a different wall can open up the whole room. Don’t be afraid to experiment with different layouts until you find one that feels spacious and functional.
Day 14: Review and Simplify Your Processes
This task goes beyond physical organization and into how you work. Inefficient processes create their own kind of clutter — clutter of time, energy, and attention.
Start with the tasks you do most frequently. How do you onboard a new client? And, how do you process invoices? How do you handle incoming emails? Write down each step, and look for places to simplify, combine steps, or eliminate unnecessary ones altogether.
Ask yourself: Am I doing anything “because that’s how I’ve always done it”? Are there tools or automations that could handle repetitive tasks? Could I create a template for something I currently do from scratch every time?
Even small simplifications add up. Cutting just five minutes from a daily process saves you over 20 hours a year. That’s more than two full workdays reclaimed.
Visit The Comprehensive Guide to Simplify a Process for a detailed walkthrough.
Day 15: Organize Your Reference Papers
You’ve made it to the final day! This last task involves the papers that tend to float around your office—reference sheets, checklists, contact lists, price guides, and other documents you keep out because you use them regularly.
The problem with keeping reference papers out is that they tend to pile up on top of other things, get mixed in with unrelated documents, and eventually disappear when you need them most.
Figure out a system that works for your workflow. Options include a wall-mounted file organizer, labeled cubbies on a shelf, a standing file sorter on your desk, or a binder with tabbed sections. The right solution depends on how often you reference these papers and how much space you have. The key rule: every paper needs a designated home. If it doesn’t have one, it will end up in a pile. And piles are where important documents go to get lost.
Maintaining Your Organized Office
Congratulations — you did it! Your office should feel noticeably different now: cleaner, calmer, and more functional. But the real challenge isn’t getting organized; it’s staying organized.
Here are a few habits that will help you maintain your decluttered space long-term:
Follow the “one in, one out” rule. Every time you bring something new into your office, something old needs to leave. This prevents the slow creep of accumulation.
Do a five-minute tidy at the end of each day. Before you shut down for the evening, put papers back where they belong, clear your desk surface, and deal with anything that landed in your inbox. Five minutes of maintenance prevents hours of catch-up later.
Schedule a monthly mini-review. Set a recurring appointment with yourself to spend 30 minutes reviewing one area of your office. Rotate through different zones each month so everything stays in check.
Digitize what you can. The less paper you have, the less there is to organize. Scan important documents, switch to digital invoicing where possible, and opt for paperless billing.
Don’t let “I’ll deal with it later” become your filing system. Every item that comes into your office should be dealt with immediately: filed, acted on, delegated, or discarded. The moment you put something in a “later” pile, you’ve created future clutter.
Frequently Asked Questions
Below are some frequently asked questions to help you with this desk decluttering project.
It depends on the size of your space and how much has accumulated, but most small business owners can work through this challenge in two to four weeks. Some days take as little as 15 minutes, while others — like organizing digital files or simplifying processes — might take a few hours. The key is to work at a pace that’s sustainable for you. Rushing through it defeats the purpose, and slow progress is still progress.
No problem! Filing cabinets are just one option. You can use a portable file box, a desktop file sorter, magazine holders on a shelf, or even a binder system with tabbed dividers. The tool doesn’t matter nearly as much as the system behind it. Whatever you choose, make sure every paper has a clear category and a designated place to live.
As a general rule, keep tax returns and supporting documents for at least seven years. Hold onto active contracts, insurance policies, and business licenses for as long as they’re current, plus a year or two after they expire. Client records depend on your industry — check any legal requirements that apply to your field. For everything else, ask yourself: “If I needed this document tomorrow, could I get another copy?” If the answer is yes, it’s probably safe to shred. When in doubt, scan it and save a digital copy before shredding the original.
The maintenance section above covers this in detail, but the short answer is: build small habits into your daily routine. A five-minute tidy at the end of each workday, a “one in, one out” rule for new items, and a monthly 30-minute review of one area will keep clutter from creeping back. The goal is to prevent buildup rather than waiting until you need another full declutter session.
Not at all — and I’d actually recommend waiting. One of the most common organizing mistakes is buying bins and containers before you know what you need to store. Work through the challenge first, purge what you don’t need, and then assess what’s left. You might find that repurposing items you already have — small boxes, mason jars, baskets, or trays — does the trick. If you do need to buy something, you’ll be able to choose the right size and style because you’ll know exactly what it needs to hold.
Absolutely. This challenge works whether you have a dedicated office, a desk in the corner of your living room, or a converted spare bedroom. If you work from home, you may find it’s more important to keep your space organized because your office and personal life share the same space. Adapt the tasks to fit your setup — if you don’t have a shipping area or break room, skip those days or use the time to tackle another area that needs attention, like your digital desktop or email inbox.
Don’t just toss old electronics in the trash — many contain materials that shouldn’t go to a landfill, and some may still hold sensitive data. Start by wiping or factory-resetting any devices that store business information. Then check with your local municipality for e-waste recycling programs or drop-off events. Retailers like Best Buy and Staples also accept old electronics for recycling. If equipment is still functional but you no longer need it, consider donating it to a local school, nonprofit, or community organization.
You’ve Got This
I hope this challenge helps you organize and declutter your office so you have easy access to what you need, when you need it. Remember, the goal isn’t a magazine-worthy space — it’s a functional one that supports the way you work.
Please leave a comment below with questions or your experience decluttering your office. I’d love to hear how the challenge went for you!
Want even more tips on decluttering the office? Check out these other experts’ articles.
Top 10 Office Decluttering Tricks
Please note the link above is an affiliate link through Amazon (affiliate), and at no additional cost to you, I will receive affiliate fees if you click through and decide to make a purchase.
Related Posts:


I love this method of getting things done. Busy people will find it difficult to schedule full days to organize their office, but chipping away at it this way makes it doable.
Thanks, Janet. I totally agree.