When starting your business, you may start racking up business expenses. So, to avoid forgetting them, developing a business tracking expenses sheet works nicely. It can be created at the beginning of the year for the entire year and will help you keep on top of when things are due.
Topics discussed
This especially works well when there are bills that are issued quarterly or yearly. I found that this worked well for all my admin bookkeeping clients (affiliate) and helped me make sure all the bills were paid and accounted for. Some of my clients (affiliate) had bills that I needed to write a check for, so if it wasn’t checked off on the list, I would follow up with the client to make sure she got a copy of the current bill. But why do you have to do this? I listed three of the main benefits of doing this.
Benefits of doing this business tracking expenses sheet.
- To reduce any issues with unpaid bills.
- It helps you remind yourself of which bills still need to be paid.
- It provides a clear view of the monthly expenses and the amount required for each month. Quarterly months will probably be higher, so allocating money to those months works excellent, and you can really see those months stand out on this tracking sheet.
Now that you are committed to staying on top of your business tracking expenses, here’s how to make a business tracking expenses sheet.
Manage your financial life and achieve more. Try Quicken for 30 days with our money-back guarantee. Products To Help You Manage Your Money:
Quicken Simplifi - Great for personal tracking
Quicken Business & Personal - perfect for mobile users strictly
Classic Quicken for Windows and Mac - Ideal for laptop users and convenient for viewing on the go.
Important areas to be included in the business tracking expenses sheet.
- Name of Payee.
- Due Date of Bill.
- Months are indicated at the top.
- How frequently do you get the bill? I like to use Q for Quarterly, W for weekly, and Y for Yearly. For Quarterly and Yearly expenses, I add Xs on the months that the bill is not due.
- Total month expenses (optional). If you want to make this more like a budget as well as a tracking sheet, you can add a “total expenses” row for each column.
- Column for the amount paid (optional). However, if you want to add the total monthly expenses row, you will need to add an amount paid column.
Examples of What the Business Expense Tracking Sheet Looks Like.
Below is an image of what this should look like. You can create it yourself using Microsoft Excel or any other spreadsheet app and add any necessary columns and rows.

How to make the Expense Sheet more detailed
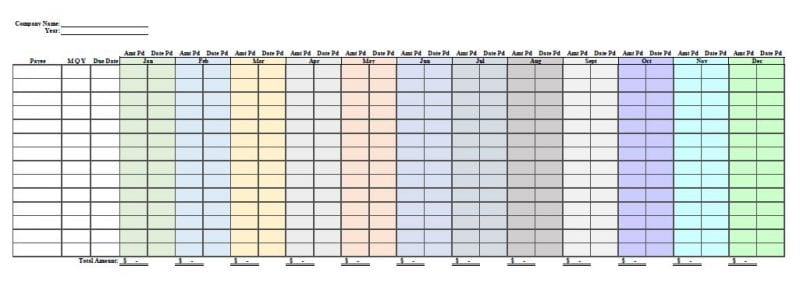
As I mentioned above, you can add the total expenses and extra columns to make it more comprehensive.
Here’s an image of what that would look like. The first column for the month shows the amount you paid, and the second column shows the date you paid it.
There is a total amount at the bottom of all the amount columns below so you can see actually how much you spent that month.
I hope this helps you start tracking your expenses and when they are due. It will keep you on track and in good standing with all your vendors.
If you want more bookkeeping tips, please visit our other bookkeeping tips posts. If you want help creating these useful spreadsheets, please contact me. I love making these tracking sheets for clients (affiliate).
Here are some additional posts I found on the subject of tracking your business expenses:
How to Make a Track Spending Spreadsheet for Home Business
